How to Make a Wig with Glue: A Simple Guide
- Emily LuxShine
- Last updated May 31, 2024
Wigs have become an essential part of the beauty industry, offering the versatility of different hairstyles and colors without altering your natural hair. With the growing demand, many suppliers provide high-quality wigs globally. However, if you want to customize your own wig and save some money, follow our tips on how to make a wig with glue.
In a previous post, we discussed making a wig using the sewing method. If sewing isn’t your forte, this non-sewing method will simplify the process.
What You Need
- Styrofoam or mannequin head: For securing the wig during construction.
- Stocking cap: Acts as the base of the wig.
- Lace closure: For a natural-looking hairline.
- Weft hair: About three bundles (100 grams each). Choose any texture you prefer. For a layered look, select bundles of the same length; for a uniform length, choose different lengths.
- Bonding glue: The adhesive to attach the weft hair to the cap.
- Bonding glue remover: Essential for correcting mistakes.
- Scissors: For trimming and cutting.
- T-pins or pearl-headed pins: To secure the cap and hair in place during the process.
Follow these steps to create a custom wig with glue, ensuring a flawless and natural appearance.

How to Make a Wig with Glue: A Step-by-Step Guide
Step 1: Prepare the Foundation
Place the stocking cap on your mannequin head, ensuring it’s evenly positioned for a smooth, final look.

Step 2: Attach the Lace Closure
- Apply bonding glue around the edges of the lace closure, avoiding the inner lace.
- Carefully place the lace closure onto the stocking cap, ensuring it covers no more than one-fourth of the cap.
- Use a blow dryer to speed up the drying process.

Step 3: Glue the Tracks
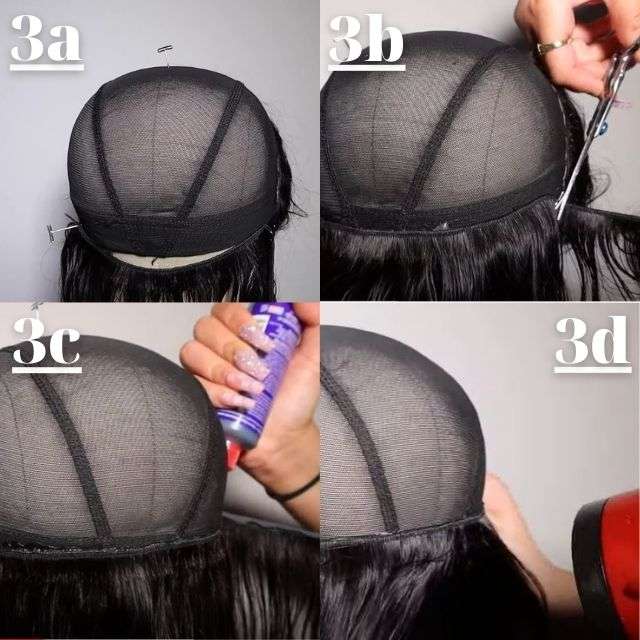
- Secure each end of the weft with T-pins, then trim any excess weft.
- Apply bonding glue to the weft stitches, avoiding the hair to prevent clumping.
- Attach the weft to the wig cap, avoiding the elastic part to maintain stretch.
- Blow-dry the track to set the glue, then repeat for the remaining tracks until reaching the closure.

Step 4: Cut the Excess Lace
- Remove the wig from the mannequin head.
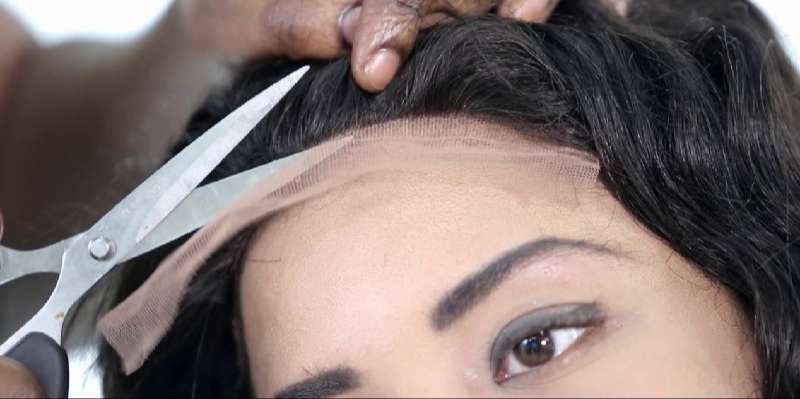
- Use scissors to trim the excess lace from the lace closure with long, smooth strokes to avoid sharp edges.
- Pull the lace tight while cutting for even results.
- Double-check for any jagged edges, especially around the forehead area.
- Trim the excess lace from the wig cap.

Step 5: Try and Style Your New Wig
- Put the wig on to check fit and appearance.
- Make necessary adjustments for a perfect fit.
- Style the wig as desired, but limit heat styling to avoid damage. If using heat tools, apply heat protectant spray first.

Follow these steps to create a custom wig with glue, ensuring a professional and natural look.
Combining Sewing and Gluing Methods
The instructions above explain how to make a wig with glue. However, many wig wearers now prefer combining sewing and gluing methods for better results. In this hybrid approach, sew the lace closure into the wig cap for a more secure attachment, while still using bonding glue for the rest of the weft tracks.
Why Combine Sewing and Gluing?
- Secure Attachment: Sewing the lace closure ensures it stays firmly in place.
- Ease of Sewing: Sewing the lace closure is simpler than sewing weft tracks. Basic stitches are sufficient, and securing each end by looping the thread two to three times enhances stability.
Quick Guide Recap
- Foundation Preparation: Place the stocking cap on the mannequin head.
- Lace Closure Attachment: Sew the lace closure instead of gluing it, ensuring secure and tight stitches.
- Track Gluing: Apply bonding glue to the weft tracks and attach them to the wig cap, avoiding the elastic part for better stretch.

Try this combined method for a custom, secure wig. Share your results and any wig-making tips in the comments below.
Luxshine Hair offers valuable tips and high-quality human hair wigs and weaves at affordable prices. Check out our collections for the best discounts. We are proud to be one of the leading Vietnamese hair vendors in the hair extensions field.

I am Emily, now CEO of Luxshine Hair, with over 10 year of experience in the hair extensions and beauty industry. I would love to share my useful knowledge about hairstyles, hair care, applications for hair extensions, and wigs. I hope, with my passion and experience, I can be able to help not only handle customer’s concerns effectively but also elevate their hair game to new heights.

