How to Install a Lace Front and Closure With 3 Ways
- Emily LuxShine
- Last updated September 30, 2024
If you have short, thin, or damaged hair, or if you’re experiencing hair loss, a lace front wig can be an excellent choice due to its quick and easy application. If you’re unsure about how to properly install a lace front wig and distinguish it from a closure, you’ve come to the right place. This article provides a complete guide on installing a lace front and closure using three simple approaches. Stay with us until the end to find the best solution for your needs!

What Is The Difference Between A Frontal And A Closure?
Lace front and closure hairpieces come in sew-in or bonded installations, offering a more natural look for wigs and hair extensions.
Closure
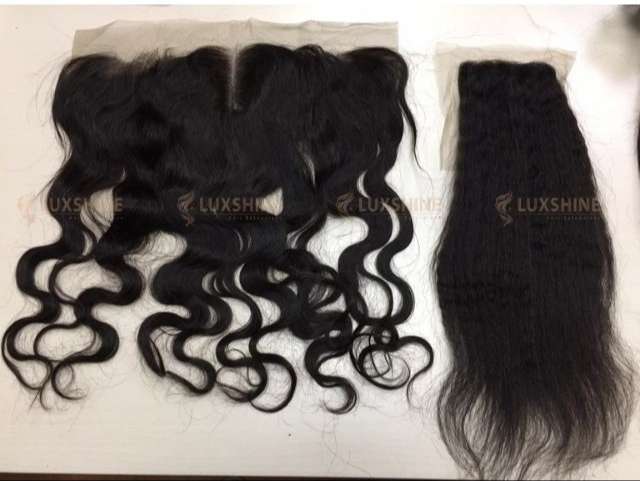
A closure typically spans from temple to temple with a standard size of 4×4 inches, forming a perfect square in the middle. Other sizes include 2×4, 2×6, 5×5, 6×6, and 7×7 inches. Closures come in two types: lace closures and Swiss lace closures, both serving the same purpose and differing mainly by personal preference.

Frontal
A frontal stretches from ear to ear or temple to temple, covering the entire front of your head. It provides more versatility in parting and styling for a natural look. Standard sizes are 13×4 inches and 13×6 inches.

In the following sections, we will explore three simple methods to install a lace front and closure.
Benefits of a Lace Front/Lace Closure

Investing in a lace front or closure is a crucial decision. Here are some benefits that explain why they are so popular in the USA and EU markets:
- Breathability: The lace front/closure has a breathable unit, allowing your scalp to breathe, making it comfortable to wear even in hot weather.
- Ideal for Thinning Hair: It’s perfect for people with a thinning scalp, helping to conceal a bald hairline.
- Versatility: Its versatility allows you to style and change the parting on your lace front easily.
- Color Customization: You can dye the lace front/closure any color without damaging your natural hair.
- Natural Look: A lace front provides a natural look without harming your hairline, thanks to its natural base, which offers better hair management.
- Durability: With proper maintenance and care, such as storing it on a mannequin head or in a satin bag, you can use your lace front/closure for up to a year.
- Skin Tone Matching: Lace fronts and closures match various skin complexions without needing to bleach the material. With a little makeup, the lace becomes virtually undetectable.
- Easy Maintenance: There’s no need to pluck hair along the hairline.
- Beginner-Friendly: A lace front is a great option for beginners due to its ease of use.
- Flexibility: It offers great flexibility in styling and usage.
How To Install A Lace Front/Lace Closure
There are several methods to install a lace front and closure simultaneously, such as using tape, elastic bands, or glue.
How To Install A Lace Front/Lace Closure Using Glue
Note: When using glue, ensure you use an adhesive specifically designed for lace fronts/closures, not lash glue or craft glue. Perform a skin test a day before to check for any allergic reactions by dabbing a small amount of adhesive on your hand.
What You Need:
- Lace frontal/Lace closure
- Lace wig cap
- Brush
- Glue
- Scissors
- Freeze spray
- Hair mousse
- Silk scarf
- Foundation brush and concealer
Step-by-Step Installation Using Glue:
- Preparation: Wash your hair thoroughly.
- Dry and Braid: Dry your hair completely, then braid it into cornrows. Secure and flatten your hair with a wig cap.
- Fit Check: Place the lace front/closure on your head to check for proper fit and alignment with your natural hairline.
- Apply Glue: Remove the lace front/closure and apply the first layer of glue in small amounts with a brush along the hairline. Blow-dry the glue.
- Second Layer: Apply a second layer of glue and blow-dry until tacky.
- Freeze Spray: Apply freeze spray to help secure the wig.
- Position and Adjust: Place the lace front/closure on your head and adjust it to ensure the hairline matches. Check both ears for alignment.
- Trim Excess Lace: If the lace front/closure is longer than your hairline, trim the excess lace with scissors.
- Blend and Style: Apply concealer to blend the knots with your skin tone for a natural look. Comb and style your hair as desired.

Installing a Lace Front/Lace Closure Without Glue
What You Need:
- Lace frontal/Lace closure
- Adjustable elastic band
- Lace wig cap
- Comb
- Scissors
- Clips
- Hair mousse
- Silk scarf
Step-by-Step Installation Without Glue:
- Preparation: Wash and dry your hair naturally.
- Braid: Braid your hair into cornrows.
- Flatten Hair: Put on the wig cap to flatten your hair, ensuring all hair is tucked in.
- Fit Check: Place the wig to check for proper fit, then trim the excess lace off the frontal.
- Trim Lace: Carefully trim the lace along your hairline with sharp scissors.
- Pluck Hairline: Pluck hair with tweezers to resemble your natural hairline and match your skin tone.
- Secure with Scarf: Tie a silk scarf over the edges to lay them in place.
- Style: Comb and style your hair as desired.

By following these steps, you can achieve a secure and natural-looking installation of your lace front/closure without using glue.
How To Install A Lace Front/Lace Closure By Sewing
What You Need:
- Lace frontal/Lace closure
- Square hairnet
- Comb
- Scissors
- Hair mousse
Step-by-Step Installation By Sewing:
- Preparation: Ensure your hair and scalp are clean before applying a lace cap.
- Cornrow Hair: Braid your hair into small, tight cornrows to keep the application smooth and flat.
- Cover with Hairnet: Cover the top of your head with a square hairnet, matching its color to your hair for a seamless blend.
- Whip-Stitching: Using a weave needle, whip-stitch the lace closure or frontal to the edge of the cornrows, starting from the back and moving to the front.

Lace frontals and closures offer the most realistic hairlines and require less effort for a natural look. This guide on installing lace fronts and closures, whether using glue, without glue, or by sewing, should help you achieve the best results. For further assistance or information about hair, don’t hesitate to contact Luxshine Hair, a renowned hair factory in Vietnam. We’re happy to help!

I am Emily, now CEO of Luxshine Hair, with over 10 year of experience in the hair extensions and beauty industry. I would love to share my useful knowledge about hairstyles, hair care, applications for hair extensions, and wigs. I hope, with my passion and experience, I can be able to help not only handle customer’s concerns effectively but also elevate their hair game to new heights.

